In this blog i am going to show how to create a new ASP.NET web forms project using visual studio 2013.
Step 1: Open visual studio
Step 2: Select New Project from File menu in visual studio

Step 3: Select the template --> Visual C# --> Web template from left pane and Choose the ASP.NET Web Application.
Give the name and select the path for the project. Here i'm giving SampleProject.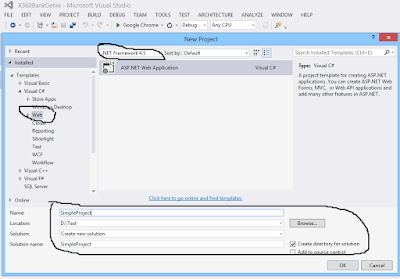
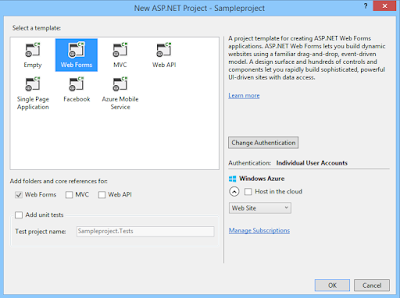
Step 4: Next, select the Web Forms and click OK.
Step 5: The project will take a little time to create. When it's ready, open Default.aspx page
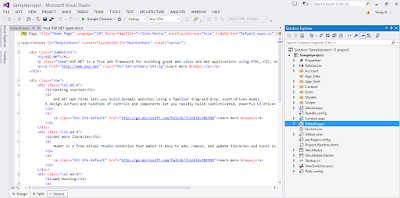
That's all you are just created a new project. Now let's take a look at the folders that have been added to your application in Solution Explorer.
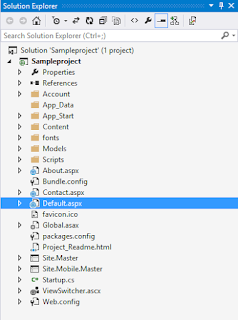
Default.aspx: Typically the first page displayed when the application is run in a browser.
Site.Master: A page that allows you to create a consistent layout and use standard behavior for pages in your application.
Global.asax: An optional file that contains code for responding to application-level and session-level events raised by ASP.NET or by HTTP modules.
Web.config: The configuration data for an application.
Running the Default Web Application
Press F5 to run the application or Ctl+Shift B

Step 1: Open visual studio
Step 2: Select New Project from File menu in visual studio

Step 3: Select the template --> Visual C# --> Web template from left pane and Choose the ASP.NET Web Application.
Give the name and select the path for the project. Here i'm giving SampleProject.

Step 4: Next, select the Web Forms and click OK.

Step 5: The project will take a little time to create. When it's ready, open Default.aspx page

That's all you are just created a new project. Now let's take a look at the folders that have been added to your application in Solution Explorer.

Default.aspx: Typically the first page displayed when the application is run in a browser.
Site.Master: A page that allows you to create a consistent layout and use standard behavior for pages in your application.
Global.asax: An optional file that contains code for responding to application-level and session-level events raised by ASP.NET or by HTTP modules.
Web.config: The configuration data for an application.
Running the Default Web Application
Press F5 to run the application or Ctl+Shift B

Comments
Post a Comment